[C#] StatusStrip(ステータスバー)にテキストを設定する方法
C#でStatusStripにテキストを設定するには、通常、StatusStripにToolStripStatusLabelを追加し、そのTextプロパティを設定します。
まず、Windows FormsデザイナーでフォームにStatusStripを追加し、次にToolStripStatusLabelをStatusStripに追加します。
コード内でテキストを設定するには、ToolStripStatusLabelのインスタンスを取得し、そのTextプロパティに表示したい文字列を代入します。
例えば、statusLabel.Text = "Ready";のように記述します。
これにより、ステータスバーに指定したテキストが表示されます。
テキストの設定方法
Textプロパティの設定
C#のWindowsフォームアプリケーションにおいて、StatusStripに表示されるテキストは、ToolStripStatusLabelのTextプロパティを使用して設定します。
以下は、基本的な設定方法のサンプルコードです。
using System.Windows.Forms;
public partial class MyForm : Form
{
    private ToolStripStatusLabel statusLabel;
    public MyForm()
    {
        InitializeComponent();

        // StatusStripの初期化
        StatusStrip statusStrip = new StatusStrip();
        statusLabel = new ToolStripStatusLabel();

        // Textプロパティにテキストを設定
        statusLabel.Text = "初期状態";

        // StatusStripにToolStripStatusLabelを追加
        statusStrip.Items.Add(statusLabel);

        // フォームにStatusStripを追加
        this.Controls.Add(statusStrip);
    }
}このコードでは、ToolStripStatusLabelのTextプロパティに「初期状態」というテキストを設定しています。
これにより、アプリケーションのステータスバーに初期メッセージが表示されます。
動的にテキストを変更する方法
アプリケーションの実行中に、StatusStripのテキストを動的に変更することも可能です。
以下のサンプルコードでは、ボタンをクリックすることでテキストを変更する方法を示します。
using System.Windows.Forms;
public partial class MyForm : Form
{
    private ToolStripStatusLabel statusLabel;
    private Button changeTextButton;
    public MyForm()
    {
        InitializeComponent();

        // StatusStripの初期化
        StatusStrip statusStrip = new StatusStrip();
        statusLabel = new ToolStripStatusLabel("初期状態");
        statusStrip.Items.Add(statusLabel);
        this.Controls.Add(statusStrip);

        // ボタンの初期化
        changeTextButton = new Button();
        changeTextButton.Text = "テキストを変更";
        changeTextButton.Click += ChangeTextButton_Click;
        this.Controls.Add(changeTextButton);
    }
    private void ChangeTextButton_Click(object sender, System.EventArgs e)
    {
        // ボタンがクリックされたときにテキストを変更
        statusLabel.Text = "テキストが変更されました";
    }
}このコードでは、ボタンをクリックすることでstatusLabelのテキストが「テキストが変更されました」に変更されます。
これにより、ユーザーに対して動的なフィードバックを提供できます。
複数のToolStripStatusLabelを使用する方法
複数のToolStripStatusLabelを使用することで、より詳細な情報を表示することができます。
以下のサンプルコードでは、2つのラベルを使用して異なる情報を表示します。
using System.Windows.Forms;
public partial class MyForm : Form
{
    private ToolStripStatusLabel statusLabel1;
    private ToolStripStatusLabel statusLabel2;
    public MyForm()
    {
        InitializeComponent();

        // StatusStripの初期化
        StatusStrip statusStrip = new StatusStrip();
        statusLabel1 = new ToolStripStatusLabel("状態: 正常");
        statusLabel2 = new ToolStripStatusLabel("接続: オンライン");

        // StatusStripにToolStripStatusLabelを追加
        statusStrip.Items.Add(statusLabel1);
        statusStrip.Items.Add(statusLabel2);

        // フォームにStatusStripを追加
        this.Controls.Add(statusStrip);
    }
}このコードでは、2つのToolStripStatusLabelを使用して、アプリケーションの状態と接続状況を表示しています。
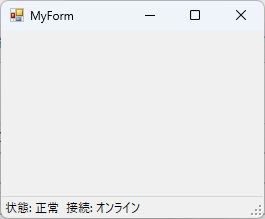
これにより、ユーザーはアプリケーションの現在の状態を一目で把握できます。
応用例
状態に応じたテキストの変更
アプリケーションの状態に応じて、StatusStripのテキストを変更することで、ユーザーに現在の状況を伝えることができます。
以下のサンプルコードでは、アプリケーションの状態に応じてテキストを変更する方法を示します。
using System.Windows.Forms;
public partial class MyForm : Form
{
    private ToolStripStatusLabel statusLabel;
    public MyForm()
    {
        InitializeComponent();

        // StatusStripの初期化
        StatusStrip statusStrip = new StatusStrip();
        statusLabel = new ToolStripStatusLabel("状態: 初期化中");
        statusStrip.Items.Add(statusLabel);
        this.Controls.Add(statusStrip);

        // 状態を変更するメソッドを呼び出す
        UpdateStatus("正常", true);
    }
    private void UpdateStatus(string message, bool isError)
    {
        // 状態に応じてテキストを変更
        statusLabel.Text = $"状態: {message}";

        // エラーの場合は色を変更
        if (isError)
        {
            statusLabel.ForeColor = System.Drawing.Color.Red;
        }
        else
        {
            statusLabel.ForeColor = System.Drawing.Color.Green;
        }
    }
}このコードでは、UpdateStatusメソッドを使用して、状態に応じたメッセージを表示しています。
エラーが発生した場合は、テキストの色を赤に変更し、正常な状態では緑に設定します。
進行状況の表示
進行状況を表示するために、StatusStripを使用して処理の進行状況を示すことができます。
以下のサンプルコードでは、進行状況を示すためにToolStripProgressBarを使用しています。
using System.Windows.Forms;
using System.Threading.Tasks;
public partial class MyForm : Form
{
    private ToolStripProgressBar progressBar;
    private ToolStripStatusLabel statusLabel;
    public MyForm()
    {
        InitializeComponent();

        // StatusStripの初期化
        StatusStrip statusStrip = new StatusStrip();
        statusLabel = new ToolStripStatusLabel("進行状況: 0%");
        progressBar = new ToolStripProgressBar();
        progressBar.Maximum = 100;

        statusStrip.Items.Add(statusLabel);
        statusStrip.Items.Add(progressBar);
        this.Controls.Add(statusStrip);

        // 進行状況を更新するメソッドを呼び出す
        UpdateProgressAsync();
    }
    private async Task UpdateProgressAsync()
    {
        for (int i = 0; i <= 100; i++)
        {
            // 進行状況を更新
            progressBar.Value = i;
            statusLabel.Text = $"進行状況: {i}%";

            // 一時停止
            await Task.Delay(50);
        }
    }
}このコードでは、UpdateProgressAsyncメソッドを使用して、進行状況を0%から100%まで更新しています。
ToolStripProgressBarを使用することで、視覚的に進行状況を示すことができます。
ユーザーインタラクションのフィードバック
ユーザーの操作に対してフィードバックを提供することは、アプリケーションの使いやすさを向上させます。
以下のサンプルコードでは、ボタンをクリックした際にStatusStripのテキストを変更してフィードバックを提供します。
using System.Windows.Forms;
public partial class MyForm : Form
{
    private ToolStripStatusLabel statusLabel;
    private Button actionButton;
    public MyForm()
    {
        InitializeComponent();

        // StatusStripの初期化
        StatusStrip statusStrip = new StatusStrip();
        statusLabel = new ToolStripStatusLabel("アクションを選択してください");
        statusStrip.Items.Add(statusLabel);
        this.Controls.Add(statusStrip);

        // ボタンの初期化
        actionButton = new Button();
        actionButton.Text = "アクション実行";
        actionButton.Click += ActionButton_Click;
        this.Controls.Add(actionButton);
    }
    private void ActionButton_Click(object sender, System.EventArgs e)
    {
        // ボタンがクリックされたときにフィードバックを提供
        statusLabel.Text = "アクションが実行されました";
    }
}このコードでは、ボタンをクリックすることでstatusLabelのテキストが「アクションが実行されました」に変更され、ユーザーに対して操作が成功したことを伝えます。
これにより、ユーザーはアプリケーションの反応を確認でき、操作の結果を理解しやすくなります。
まとめ
この記事では、C#のWindowsフォームアプリケーションにおけるStatusStripのテキスト設定方法や応用例について詳しく解説しました。
特に、状態に応じたテキストの変更や進行状況の表示、ユーザーインタラクションに対するフィードバックの提供方法に焦点を当てました。
これらの知識を活用して、アプリケーションのユーザーエクスペリエンスを向上させるために、ぜひStatusStripを効果的に活用してみてください。
![[C#] StatusStrip(ステータスバー)の追加方法と活用法](https://af-e.net/wp-content/uploads/2024/09/thumbnail-38372.png)
![[C#] ステータスバーを複数行表示する方法](https://af-e.net/wp-content/uploads/2024/09/thumbnail-38373.png)
![[C#] StatusStripのデザインをカスタマイズする方法](https://af-e.net/wp-content/uploads/2024/09/thumbnail-38367.png)
![[C#] ステータスバーの表示を更新する方法](https://af-e.net/wp-content/uploads/2024/09/thumbnail-38370.png)
![[C#] ステータスバーにプログレスバーを表示する方法](https://af-e.net/wp-content/uploads/2024/09/thumbnail-38368.png)
![[C#] StatusStripのレイアウト設定方法](https://af-e.net/wp-content/uploads/2024/09/thumbnail-38369.png)
![[C#] StatusStripの使い方と基本的な実装方法](https://af-e.net/wp-content/uploads/2024/09/thumbnail-38371.png)
![[C#] ステータスバー(statusstrip)の見た目をカスタマイズする方法](https://af-e.net/wp-content/uploads/2024/09/thumbnail-38364.png)
![[C#] StatusStripの使い方と活用法](https://af-e.net/wp-content/uploads/2024/09/thumbnail-38365.png)