[C#] StatusStripのデザインをカスタマイズする方法
C#のWindows FormsアプリケーションでStatusStripのデザインをカスタマイズするには、いくつかの方法があります。
まず、StatusStripのプロパティを設定して、背景色やフォントを変更できます。
BackColorプロパティで背景色を、Fontプロパティでフォントスタイルを指定します。
また、RenderModeプロパティをProfessionalに設定すると、より洗練された外観になります。
さらに、StatusStripに追加するToolStripStatusLabelやToolStripProgressBarなどのアイテムも個別にスタイルを設定できます。
カスタム描画が必要な場合は、ToolStripRendererを継承して独自のレンダリングロジックを実装することも可能です。
背景色とフォントのカスタマイズ
背景色の変更方法
C#のWindowsフォームアプリケーションにおいて、StatusStripの背景色を変更するには、BackColorプロパティを使用します。
以下のサンプルコードでは、StatusStripの背景色を青色に設定しています。
partial class MyForm : Form
{
    private StatusStrip statusStrip;
    public MyForm()
    {
        InitializeComponent();

        // StatusStripのインスタンスを作成
        statusStrip = new StatusStrip();

        // 背景色を青色に設定
        statusStrip.BackColor = Color.Blue;

        // フォームにStatusStripを追加
        this.Controls.Add(statusStrip);
    }
}
このコードを実行すると、StatusStripの背景色が青色に変更されます。
フォントスタイルの設定
StatusStrip内のテキストのフォントスタイルを変更するには、Fontプロパティを使用します。
以下のサンプルコードでは、フォントを太字のArialに設定しています。
partial class MyForm : Form
{
    private StatusStrip statusStrip;
    private ToolStripStatusLabel statusLabel;
    public MyForm()
    {
        InitializeComponent();

        // StatusStripのインスタンスを作成
        statusStrip = new StatusStrip();

        // ToolStripStatusLabelのインスタンスを作成
        statusLabel = new ToolStripStatusLabel("ステータスメッセージ");

        // フォントを太字のArialに設定
        statusLabel.Font = new Font("Arial", 10, FontStyle.Bold);

        // StatusStripにToolStripStatusLabelを追加
        statusStrip.Items.Add(statusLabel);

        // フォームにStatusStripを追加
        this.Controls.Add(statusStrip);
    }
}
このコードを実行すると、StatusStrip内のテキストが太字のArialフォントで表示されます。
テーマに合わせたデザイン調整
アプリケーションのテーマに合わせてStatusStripのデザインを調整することも可能です。
以下のサンプルコードでは、ダークテーマに合わせた色合いを設定しています。
partial class MyForm : Form
{
    private StatusStrip statusStrip;
    private ToolStripStatusLabel statusLabel;
    public MyForm()
    {
        InitializeComponent();

        // StatusStripのインスタンスを作成
        statusStrip = new StatusStrip();

        // ToolStripStatusLabelのインスタンスを作成
        statusLabel = new ToolStripStatusLabel("ダークテーマのステータス");

        // 背景色を黒に設定
        statusStrip.BackColor = Color.Black;

        // フォントを白色に設定
        statusLabel.ForeColor = Color.White;

        // StatusStripにToolStripStatusLabelを追加
        statusStrip.Items.Add(statusLabel);

        // フォームにStatusStripを追加
        this.Controls.Add(statusStrip);
    }
}このコードを実行すると、StatusStripがダークテーマに合わせたデザインで表示されます。

背景が黒く、テキストが白色になります。
StatusStripのアイテムカスタマイズ
ToolStripStatusLabelのカスタマイズ
ToolStripStatusLabelは、StatusStrip内で情報を表示するためのアイテムです。
カスタマイズすることで、表示内容やスタイルを変更できます。
以下のサンプルコードでは、ToolStripStatusLabelのテキスト、フォント、色を変更しています。
partial class MyForm : Form
{
    private StatusStrip statusStrip;
    private ToolStripStatusLabel statusLabel;
    public MyForm()
    {
        InitializeComponent();

        // StatusStripのインスタンスを作成
        statusStrip = new StatusStrip();

        // ToolStripStatusLabelのインスタンスを作成
        statusLabel = new ToolStripStatusLabel("初期メッセージ");

        // フォントを設定
        statusLabel.Font = new Font("Arial", 12, FontStyle.Italic);

        // テキストの色を緑に設定
        statusLabel.ForeColor = Color.Green;

        // StatusStripにToolStripStatusLabelを追加
        statusStrip.Items.Add(statusLabel);

        // フォームにStatusStripを追加
        this.Controls.Add(statusStrip);
    }
}
このコードを実行すると、ToolStripStatusLabelがイタリック体の緑色で表示されます。
ToolStripProgressBarのデザイン変更
ToolStripProgressBarは、進行状況を視覚的に表示するためのアイテムです。
デザインを変更することで、進行状況の表示をカスタマイズできます。
以下のサンプルコードでは、ToolStripProgressBarのスタイルと色を変更しています。
partial class MyForm : Form
{
    private StatusStrip statusStrip;
    private ToolStripProgressBar progressBar;
    public MyForm()
    {
        InitializeComponent();

        // StatusStripのインスタンスを作成
        statusStrip = new StatusStrip();

        // ToolStripProgressBarのインスタンスを作成
        progressBar = new ToolStripProgressBar();

        // 最大値と最小値を設定
        progressBar.Minimum = 0;
        progressBar.Maximum = 100;

        // 現在の値を設定
        progressBar.Value = 50;

        // プログレスバーの色を変更(カスタム描画が必要)
        progressBar.ForeColor = Color.Blue;

        // StatusStripにToolStripProgressBarを追加
        statusStrip.Items.Add(progressBar);

        // フォームにStatusStripを追加
        this.Controls.Add(statusStrip);
    }
}
このコードを実行すると、ToolStripProgressBarが青色で表示され、50%の進行状況を示します。
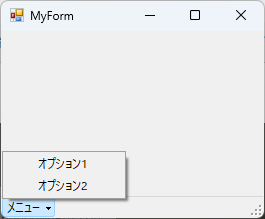
ToolStripDropDownButtonの利用
ToolStripDropDownButtonは、ドロップダウンメニューを表示するためのアイテムです。
これを使用することで、ユーザーに選択肢を提供できます。
以下のサンプルコードでは、ToolStripDropDownButtonを作成し、メニュー項目を追加しています。
partial class MyForm : Form
{
    private StatusStrip statusStrip;
    private ToolStripDropDownButton dropDownButton;
    public MyForm()
    {
        InitializeComponent();

        // StatusStripのインスタンスを作成
        statusStrip = new StatusStrip();

        // ToolStripDropDownButtonのインスタンスを作成
        dropDownButton = new ToolStripDropDownButton("メニュー");

        // メニュー項目を追加
        dropDownButton.DropDownItems.Add("オプション1", null, OnOption1Click);
        dropDownButton.DropDownItems.Add("オプション2", null, OnOption2Click);

        // StatusStripにToolStripDropDownButtonを追加
        statusStrip.Items.Add(dropDownButton);

        // フォームにStatusStripを追加
        this.Controls.Add(statusStrip);
    }
    private void OnOption1Click(object sender, EventArgs e)
    {
        MessageBox.Show("オプション1が選択されました。");
    }
    private void OnOption2Click(object sender, EventArgs e)
    {
        MessageBox.Show("オプション2が選択されました。");
    }
}
このコードを実行すると、ToolStripDropDownButtonが表示され、メニュー項目を選択することでメッセージボックスが表示されます。
高度なカスタマイズ
RenderModeの設定
StatusStripの描画スタイルを変更するには、RenderModeプロパティを使用します。
これにより、StatusStripの外観を異なるスタイルに設定できます。
以下のサンプルコードでは、RenderModeをProfessionalに設定しています。
partial class MyForm : Form
{
    private StatusStrip statusStrip;
    public MyForm()
    {
        InitializeComponent();

        // StatusStripのインスタンスを作成
        statusStrip = new StatusStrip();

        // RenderModeをProfessionalに設定
        statusStrip.RenderMode = ToolStripRenderMode.Professional;

        // フォームにStatusStripを追加
        this.Controls.Add(statusStrip);
    }
}このコードを実行すると、StatusStripがプロフェッショナルスタイルで描画されます。
RenderModeには、SystemやProfessional、Customなどのオプションがあります。
イベントを利用した動的なデザイン変更
StatusStripのデザインを動的に変更するには、イベントを利用することができます。
以下のサンプルコードでは、ボタンをクリックすることでStatusStripの背景色を変更しています。
partial class MyForm : Form
{
    private StatusStrip statusStrip;
    private Button changeColorButton;
    public MyForm()
    {
        InitializeComponent();

        // StatusStripのインスタンスを作成
        statusStrip = new StatusStrip();

        // ボタンのインスタンスを作成
        changeColorButton = new Button();
        changeColorButton.Text = "色を変更";
        changeColorButton.Click += ChangeColorButton_Click;

        // フォームにボタンを追加
        this.Controls.Add(changeColorButton);

        // フォームにStatusStripを追加
        this.Controls.Add(statusStrip);
    }
    private void ChangeColorButton_Click(object sender, EventArgs e)
    {
        // StatusStripの背景色をランダムに変更
        Random random = new Random();
        statusStrip.BackColor = Color.FromArgb(random.Next(256), random.Next(256), random.Next(256));
    }
}このコードを実行すると、ボタンをクリックするたびにStatusStripの背景色がランダムに変更されます。
イベントを利用することで、ユーザーの操作に応じた動的なデザイン変更が可能になります。
実践的なデザイン例
シンプルなデザインの例
シンプルなデザインは、ユーザーにとって使いやすく、視覚的にわかりやすいインターフェースを提供します。
以下のサンプルコードでは、シンプルなStatusStripを作成し、基本的な情報を表示しています。
partial class MyForm : Form
{
    private StatusStrip statusStrip;
    private ToolStripStatusLabel statusLabel;
    public MyForm()
    {
        InitializeComponent();

        // StatusStripのインスタンスを作成
        statusStrip = new StatusStrip();

        // ToolStripStatusLabelのインスタンスを作成
        statusLabel = new ToolStripStatusLabel("状態: 正常");

        // StatusStripにToolStripStatusLabelを追加
        statusStrip.Items.Add(statusLabel);

        // フォームにStatusStripを追加
        this.Controls.Add(statusStrip);
    }
}このコードを実行すると、StatusStripに「状態: 正常」というシンプルなメッセージが表示されます。
シンプルなデザインは、情報を明確に伝えるのに適しています。
ビジネスアプリケーション向けデザイン
ビジネスアプリケーションでは、情報の整理や視認性が重要です。
以下のサンプルコードでは、ビジネス向けのStatusStripを作成し、進行状況やメッセージを表示しています。
partial class MyForm : Form
{
    private StatusStrip statusStrip;
    private ToolStripStatusLabel statusLabel;
    private ToolStripProgressBar progressBar;
    public MyForm()
    {
        InitializeComponent();

        // StatusStripのインスタンスを作成
        statusStrip = new StatusStrip();

        // ToolStripStatusLabelのインスタンスを作成
        statusLabel = new ToolStripStatusLabel("処理中...");

        // ToolStripProgressBarのインスタンスを作成
        progressBar = new ToolStripProgressBar();
        progressBar.Minimum = 0;
        progressBar.Maximum = 100;
        progressBar.Value = 30; // 進行状況を30%に設定

        // StatusStripにアイテムを追加
        statusStrip.Items.Add(statusLabel);
        statusStrip.Items.Add(progressBar);

        // フォームにStatusStripを追加
        this.Controls.Add(statusStrip);
    }
}このコードを実行すると、StatusStripに「処理中…」というメッセージと、30%の進行状況を示すプログレスバーが表示されます。
ビジネスアプリケーションにおいて、ユーザーに進行状況を示すことは重要です。
ゲームアプリケーション向けデザイン
ゲームアプリケーションでは、視覚的なインパクトやエンターテイメント性が求められます。
以下のサンプルコードでは、ゲーム向けのStatusStripを作成し、スコアやレベルを表示しています。
partial class MyForm : Form
{
    private StatusStrip statusStrip;
    private ToolStripStatusLabel scoreLabel;
    private ToolStripStatusLabel levelLabel;
    public MyForm()
    {
        InitializeComponent();

        // StatusStripのインスタンスを作成
        statusStrip = new StatusStrip();

        // スコア表示用のToolStripStatusLabelを作成
        scoreLabel = new ToolStripStatusLabel("スコア: 0");

        // レベル表示用のToolStripStatusLabelを作成
        levelLabel = new ToolStripStatusLabel("レベル: 1");

        // StatusStripにアイテムを追加
        statusStrip.Items.Add(scoreLabel);
        statusStrip.Items.Add(levelLabel);

        // フォームにStatusStripを追加
        this.Controls.Add(statusStrip);
    }
}このコードを実行すると、StatusStripに「スコア: 0」と「レベル: 1」という情報が表示されます。
ゲームアプリケーションでは、スコアやレベルの表示がプレイヤーのモチベーションを高める要素となります。
まとめ
この記事では、C#のWindowsフォームにおけるStatusStripのカスタマイズ方法について詳しく解説しました。
背景色やフォントの変更、アイテムのカスタマイズ、さらには高度なデザイン調整や実践的なデザイン例を通じて、StatusStripを効果的に活用する方法を紹介しました。
これを参考にして、あなたのアプリケーションに合った魅力的なStatusStripを作成し、ユーザーにとって使いやすいインターフェースを提供してみてください。

![[C#] ステータスバーを複数行表示する方法](https://bunny-wp-pullzone-tn5yudgj3a.b-cdn.net/wp-content/uploads/2024/09/thumbnail-38373.png)
![[C#] StatusStrip(ステータスバー)の追加方法と活用法](https://bunny-wp-pullzone-tn5yudgj3a.b-cdn.net/wp-content/uploads/2024/09/thumbnail-38372.png)
![[C#] StatusStripのレイアウト設定方法](https://bunny-wp-pullzone-tn5yudgj3a.b-cdn.net/wp-content/uploads/2024/09/thumbnail-38369.png)
![[C#] ステータスバーにプログレスバーを表示する方法](https://bunny-wp-pullzone-tn5yudgj3a.b-cdn.net/wp-content/uploads/2024/09/thumbnail-38368.png)
![[C#] StatusStripの使い方と基本的な実装方法](https://bunny-wp-pullzone-tn5yudgj3a.b-cdn.net/wp-content/uploads/2024/09/thumbnail-38371.png)
![[C#] StatusStrip(ステータスバー)にテキストを設定する方法](https://bunny-wp-pullzone-tn5yudgj3a.b-cdn.net/wp-content/uploads/2024/09/thumbnail-38366.png)
![[C#] ステータスバーの表示を更新する方法](https://bunny-wp-pullzone-tn5yudgj3a.b-cdn.net/wp-content/uploads/2024/09/thumbnail-38370.png)
![[C#] StatusStripの使い方と活用法](https://bunny-wp-pullzone-tn5yudgj3a.b-cdn.net/wp-content/uploads/2024/09/thumbnail-38365.png)
![[C#] ステータスバー(statusstrip)の見た目をカスタマイズする方法](https://bunny-wp-pullzone-tn5yudgj3a.b-cdn.net/wp-content/uploads/2024/09/thumbnail-38364.png)