[C#] RadioButtonのグループ化方法と実践的な活用法
C#でRadioButtonをグループ化するには、同じコンテナ(例えば、PanelやGroupBox)に配置するか、同じGroupNameプロパティを設定します。
これにより、同じグループ内のRadioButtonは排他的に選択され、1つのボタンを選択すると他のボタンは自動的に解除されます。
実践的な活用法としては、ユーザーに選択肢を提供するフォームでの使用が一般的です。
例えば、性別選択や支払い方法の選択など、ユーザーが一つの選択肢を選ぶ必要がある場面で役立ちます。
RadioButtonを使うことで、ユーザーインターフェースが直感的になり、選択肢の中から一つを選ぶ操作が簡単になります。
RadioButtonのグループ化方法
同じコンテナに配置する方法
Panelを使用したグループ化
C#のWindowsフォームアプリケーションでは、Panelコントロールを使用して複数のRadioButtonをグループ化することができます。
Panelは、子コントロールをまとめて配置するためのコンテナです。
以下は、Panelを使用してRadioButtonをグループ化するサンプルコードです。
partial class MyForm : Form
{
    public MyForm()
    {
        InitializeComponent();
        // Panelを作成
        Panel panel = new Panel();
        panel.Location = new Point(10, 10);
        panel.Size = new Size(200, 100);
        // RadioButtonを作成
        RadioButton radioButton1 = new RadioButton();
        radioButton1.Text = "オプション1";
        radioButton1.Location = new Point(10, 10);
        RadioButton radioButton2 = new RadioButton();
        radioButton2.Text = "オプション2";
        radioButton2.Location = new Point(10, 40);
        // PanelにRadioButtonを追加
        panel.Controls.Add(radioButton1);
        panel.Controls.Add(radioButton2);
        // フォームにPanelを追加
        this.Controls.Add(panel);
    }
}このコードでは、Panelを作成し、その中に2つのRadioButtonを配置しています。
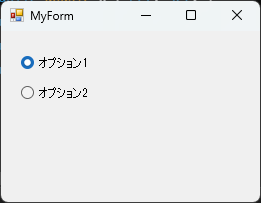
これにより、ユーザーは同じグループ内から1つのオプションを選択できます。
GroupBoxを使用したグループ化
GroupBoxコントロールも、RadioButtonをグループ化するために非常に便利です。
GroupBoxは、グループのタイトルを表示できるため、ユーザーにとってわかりやすいインターフェースを提供します。
以下は、GroupBoxを使用したサンプルコードです。
partial class MyForm : Form
{
    public MyForm()
    {
        InitializeComponent();
        // GroupBoxを作成
        GroupBox groupBox = new GroupBox();
        groupBox.Text = "選択してください";
        groupBox.Location = new Point(10, 10);
        groupBox.Size = new Size(200, 100);
        // RadioButtonを作成
        RadioButton radioButton1 = new RadioButton();
        radioButton1.Text = "オプション1";
        radioButton1.Location = new Point(10, 20);
        RadioButton radioButton2 = new RadioButton();
        radioButton2.Text = "オプション2";
        radioButton2.Location = new Point(10, 50);
        // GroupBoxにRadioButtonを追加
        groupBox.Controls.Add(radioButton1);
        groupBox.Controls.Add(radioButton2);
        // フォームにGroupBoxを追加
        this.Controls.Add(groupBox);
    }
}このコードでは、GroupBoxを作成し、その中に2つのRadioButtonを配置しています。
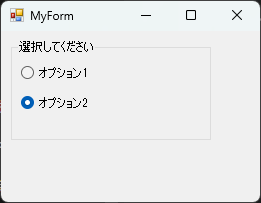
GroupBoxのタイトルがあることで、ユーザーはどの選択肢が関連しているのかを簡単に理解できます。
GroupNameプロパティを使用する方法
GroupNameの設定方法
RadioButtonには、GroupNameプロパティを使用してグループ化する方法もあります。
このプロパティを設定することで、同じ名前のグループに属するRadioButton同士が相互に排他的に選択されるようになります。
以下は、GroupNameを使用したサンプルコードです。
partial class MyForm : Form
{
    public MyForm()
    {
        InitializeComponent();
        // RadioButtonを作成
        RadioButton radioButton1 = new RadioButton();
        radioButton1.Text = "オプション1";
        radioButton1.Location = new Point(10, 10);
        radioButton1.GroupName = "グループ1"; // グループ名を設定
        RadioButton radioButton2 = new RadioButton();
        radioButton2.Text = "オプション2";
        radioButton2.Location = new Point(10, 40);
        radioButton2.GroupName = "グループ1"; // 同じグループ名を設定
        // フォームにRadioButtonを追加
        this.Controls.Add(radioButton1);
        this.Controls.Add(radioButton2);
    }
}このコードでは、2つのRadioButtonに同じGroupNameを設定しています。
これにより、ユーザーはどちらか一方のみを選択できるようになります。
GroupNameを使ったグループ化の利点
GroupNameプロパティを使用することで、以下のような利点があります。
- 簡潔なコード:
PanelやGroupBoxを使用する必要がなく、コードがシンプルになります。 - 柔軟性: 同じフォーム内で異なるグループを簡単に作成できます。
- 視覚的な整理: グループ名を設定することで、選択肢の関連性を明確に示すことができます。
このように、RadioButtonのグループ化は、ユーザーインターフェースを整理し、使いやすくするための重要な手法です。
RadioButtonの実践的な活用法
ユーザー入力フォームでの活用
性別選択の実装例
ユーザー入力フォームで性別を選択する際に、RadioButtonを使用することが一般的です。
以下は、性別選択の実装例です。
partial class MyForm : Form
{
    public MyForm()
    {
        InitializeComponent();
        // 性別選択用のRadioButtonを作成
        RadioButton radioButtonMale = new RadioButton();
        radioButtonMale.Text = "男性";
        radioButtonMale.Location = new Point(10, 10);
        RadioButton radioButtonFemale = new RadioButton();
        radioButtonFemale.Text = "女性";
        radioButtonFemale.Location = new Point(10, 40);
        // フォームにRadioButtonを追加
        this.Controls.Add(radioButtonMale);
        this.Controls.Add(radioButtonFemale);
    }
}このコードでは、性別を選択するための2つのRadioButtonを作成し、フォームに追加しています。
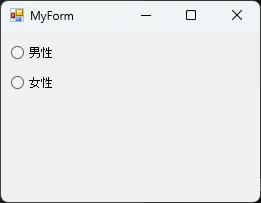
ユーザーは「男性」または「女性」のいずれかを選択できます。
支払い方法選択の実装例
オンラインショッピングなどのアプリケーションでは、支払い方法を選択するためにRadioButtonを使用することが多いです。
以下は、支払い方法選択の実装例です。
partial class MyForm : Form
{
    public MyForm()
    {
        InitializeComponent();
        // 支払い方法選択用のRadioButtonを作成
        RadioButton radioButtonCreditCard = new RadioButton();
        radioButtonCreditCard.Text = "クレジットカード";
        radioButtonCreditCard.Location = new Point(10, 10);
        RadioButton radioButtonPayPal = new RadioButton();
        radioButtonPayPal.Text = "PayPal";
        radioButtonPayPal.Location = new Point(10, 40);
        // フォームにRadioButtonを追加
        this.Controls.Add(radioButtonCreditCard);
        this.Controls.Add(radioButtonPayPal);
    }
}
このコードでは、支払い方法として「クレジットカード」と PayPal を選択できるRadioButtonを作成しています。
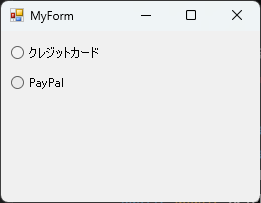
ユーザーは希望する支払い方法を選択できます。
設定画面での活用
表示設定の選択
アプリケーションの設定画面では、表示設定を選択するためにRadioButtonを使用することができます。
以下は、表示設定の選択の実装例です。
partial class MyForm : Form
{
    public MyForm()
    {
        InitializeComponent();
        // 表示設定用のRadioButtonを作成
        RadioButton radioButtonLightMode = new RadioButton();
        radioButtonLightMode.Text = "ライトモード";
        radioButtonLightMode.Location = new Point(10, 10);
        RadioButton radioButtonDarkMode = new RadioButton();
        radioButtonDarkMode.Text = "ダークモード";
        radioButtonDarkMode.Location = new Point(10, 40);
        // フォームにRadioButtonを追加
        this.Controls.Add(radioButtonLightMode);
        this.Controls.Add(radioButtonDarkMode);
    }
}このコードでは、アプリケーションの表示設定として「ライトモード」と「ダークモード」を選択できるRadioButtonを作成しています。
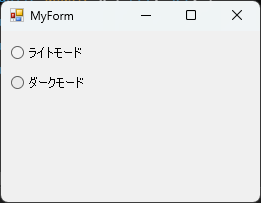
ユーザーは好みの表示モードを選択できます。
通知設定の選択
通知設定を選択する際にも、RadioButtonが役立ちます。
以下は、通知設定の選択の実装例です。
partial class MyForm : Form
{
    public MyForm()
    {
        InitializeComponent();
        // 通知設定用のRadioButtonを作成
        RadioButton radioButtonEmail = new RadioButton();
        radioButtonEmail.Text = "メール通知";
        radioButtonEmail.Location = new Point(10, 10);
        RadioButton radioButtonSMS = new RadioButton();
        radioButtonSMS.Text = "SMS通知";
        radioButtonSMS.Location = new Point(10, 40);
        // フォームにRadioButtonを追加
        this.Controls.Add(radioButtonEmail);
        this.Controls.Add(radioButtonSMS);
    }
}このコードでは、通知方法として「メール通知」と「SMS通知」を選択できるRadioButtonを作成しています。
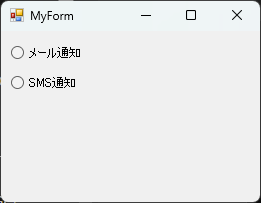
ユーザーは希望する通知方法を選択できます。
アンケートフォームでの活用
満足度調査の実装例
アンケートフォームでは、ユーザーの満足度を調査するためにRadioButtonを使用することができます。
以下は、満足度調査の実装例です。
partial class MyForm : Form
{
    public MyForm()
    {
        InitializeComponent();
        // 満足度調査用のRadioButtonを作成
        RadioButton radioButtonVerySatisfied = new RadioButton();
        radioButtonVerySatisfied.Text = "非常に満足";
        radioButtonVerySatisfied.Location = new Point(10, 10);
        RadioButton radioButtonSatisfied = new RadioButton();
        radioButtonSatisfied.Text = "満足";
        radioButtonSatisfied.Location = new Point(10, 40);
        RadioButton radioButtonDissatisfied = new RadioButton();
        radioButtonDissatisfied.Text = "不満";
        radioButtonDissatisfied.Location = new Point(10, 70);
        // フォームにRadioButtonを追加
        this.Controls.Add(radioButtonVerySatisfied);
        this.Controls.Add(radioButtonSatisfied);
        this.Controls.Add(radioButtonDissatisfied);
    }
}このコードでは、満足度を「非常に満足」「満足」「不満」の3つから選択できるRadioButtonを作成しています。
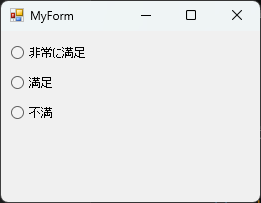
ユーザーは自分の満足度を選択できます。
製品選択の実装例
製品選択のアンケートでも、RadioButtonが役立ちます。
以下は、製品選択の実装例です。
partial class MyForm : Form
{
    public MyForm()
    {
        InitializeComponent();
        // 製品選択用のRadioButtonを作成
        RadioButton radioButtonProductA = new RadioButton();
        radioButtonProductA.Text = "製品A";
        radioButtonProductA.Location = new Point(10, 10);
        RadioButton radioButtonProductB = new RadioButton();
        radioButtonProductB.Text = "製品B";
        radioButtonProductB.Location = new Point(10, 40);
        RadioButton radioButtonProductC = new RadioButton();
        radioButtonProductC.Text = "製品C";
        radioButtonProductC.Location = new Point(10, 70);
        // フォームにRadioButtonを追加
        this.Controls.Add(radioButtonProductA);
        this.Controls.Add(radioButtonProductB);
        this.Controls.Add(radioButtonProductC);
    }
}このコードでは、製品を「製品A」「製品B」「製品C」から選択できるRadioButtonを作成しています。
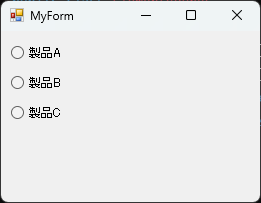
ユーザーは希望する製品を選択できます。
RadioButtonのイベント処理
CheckedChangedイベントの活用
RadioButtonのCheckedChangedイベントは、選択状態が変更されたときに発生します。
このイベントを利用することで、ユーザーが選択したオプションに応じてアプリケーションの動作を変更することができます。
イベントハンドラの設定方法
CheckedChangedイベントのハンドラを設定するには、RadioButtonのインスタンスに対してイベントを追加します。
以下は、イベントハンドラを設定する方法の例です。
partial class MyForm : Form
{
    public MyForm()
    {
        InitializeComponent();
        // RadioButtonを作成
        RadioButton radioButton1 = new RadioButton();
        radioButton1.Text = "オプション1";
        radioButton1.Location = new Point(10, 10);
        radioButton1.CheckedChanged += RadioButton_CheckedChanged; // イベントハンドラを設定
        RadioButton radioButton2 = new RadioButton();
        radioButton2.Text = "オプション2";
        radioButton2.Location = new Point(10, 40);
        radioButton2.CheckedChanged += RadioButton_CheckedChanged; // イベントハンドラを設定
        // フォームにRadioButtonを追加
        this.Controls.Add(radioButton1);
        this.Controls.Add(radioButton2);
    }
    private void RadioButton_CheckedChanged(object sender, EventArgs e)
    {
        // 選択されたRadioButtonの処理をここに記述
    }
}このコードでは、2つのRadioButtonに対してCheckedChangedイベントのハンドラを設定しています。
RadioButton_CheckedChangedメソッドがイベント発生時に呼び出されます。
イベント処理の実装例
CheckedChangedイベントの処理を実装することで、選択されたRadioButtonに応じたアクションを実行できます。
以下は、選択されたオプションに応じてメッセージを表示する実装例です。
private void RadioButton_CheckedChanged(object sender, EventArgs e)
{
    RadioButton selectedRadioButton = sender as RadioButton; // 送信元のRadioButtonを取得
    if (selectedRadioButton != null && selectedRadioButton.Checked) // 選択されている場合
    {
        MessageBox.Show($"選択されたオプション: {selectedRadioButton.Text}");
    }
}このコードでは、選択されたRadioButtonのテキストをメッセージボックスで表示します。
ユーザーがどのオプションを選択したかを確認できます。
状態の保存と復元
アプリケーションの状態を保存し、後で復元することは、ユーザーエクスペリエンスを向上させるために重要です。
RadioButtonの選択状態も同様に保存し、復元することができます。
選択状態の保存方法
選択状態を保存するには、RadioButtonのCheckedプロパティを使用して、選択されているオプションを記録します。
以下は、選択状態を保存する方法の例です。
private string selectedOption; // 選択されたオプションを保存する変数
private void SaveSelectedOption()
{
    if (radioButton1.Checked)
    {
        selectedOption = radioButton1.Text; // オプション1が選択されている場合
    }
    else if (radioButton2.Checked)
    {
        selectedOption = radioButton2.Text; // オプション2が選択されている場合
    }
}このコードでは、選択されたRadioButtonのテキストをselectedOption変数に保存しています。
ユーザーが選択したオプションを後で復元するために使用します。
選択状態の復元方法
保存した選択状態を復元するには、RadioButtonのCheckedプロパティを設定します。
以下は、選択状態を復元する方法の例です。
private void RestoreSelectedOption()
{
    if (selectedOption == radioButton1.Text)
    {
        radioButton1.Checked = true; // オプション1を選択
    }
    else if (selectedOption == radioButton2.Text)
    {
        radioButton2.Checked = true; // オプション2を選択
    }
}このコードでは、保存された選択状態に基づいて、適切なRadioButtonを選択します。
これにより、アプリケーションを再起動した際や、ユーザーが設定を変更した際に、以前の選択状態を復元することができます。
RadioButtonのデザインカスタマイズ
外観の変更方法
RadioButtonの外観をカスタマイズすることで、アプリケーションのデザインに統一感を持たせたり、ユーザーの視認性を向上させたりすることができます。
以下では、RadioButtonの外観を変更する方法について説明します。
フォントと色の設定
RadioButtonのフォントや色を変更することで、視覚的な印象を大きく変えることができます。
以下は、フォントと色を設定するサンプルコードです。
partial class MyForm : Form
{
    public MyForm()
    {
        InitializeComponent();
        // RadioButtonを作成
        RadioButton radioButton1 = new RadioButton();
        radioButton1.Text = "オプション1";
        radioButton1.Location = new Point(10, 10);

        // フォントの設定
        radioButton1.Font = new Font("メイリオ", 12, FontStyle.Bold);

        // 色の設定
        radioButton1.ForeColor = Color.Blue; // テキストの色を青に設定
        // フォームにRadioButtonを追加
        this.Controls.Add(radioButton1);
    }
}このコードでは、RadioButtonのフォントを「メイリオ」に設定し、サイズを12ポイント、スタイルを太字にしています。
また、テキストの色を青に変更しています。
サイズと位置の調整
RadioButtonのサイズや位置を調整することで、レイアウトを整えることができます。
以下は、サイズと位置を調整するサンプルコードです。
partial class MyForm : Form
{
    public MyForm()
    {
        InitializeComponent();
        // RadioButtonを作成
        RadioButton radioButton1 = new RadioButton();
        radioButton1.Text = "オプション1";
        radioButton1.Location = new Point(10, 10);
        radioButton1.Size = new Size(150, 30); // サイズを設定
        // フォームにRadioButtonを追加
        this.Controls.Add(radioButton1);
    }
}このコードでは、RadioButtonのサイズを150×30ピクセルに設定しています。
これにより、テキストが見やすくなります。
カスタムスタイルの適用
RadioButtonにカスタムスタイルを適用することで、より独自性のあるデザインを実現できます。
以下では、カスタムスタイルの適用方法について説明します。
カスタムコントロールの作成
独自のデザインを持つRadioButtonを作成するために、カスタムコントロールを作成することができます。
以下は、カスタムコントロールの作成例です。
public class CustomRadioButton : RadioButton
{
    protected override void OnPaint(PaintEventArgs e)
    {
        base.OnPaint(e);

        // カスタム描画の実装
        e.Graphics.FillEllipse(Brushes.LightGray, 0, 0, 20, 20); // 円を描画
        if (Checked)
        {
            e.Graphics.FillEllipse(Brushes.Blue, 5, 5, 10, 10); // チェックされた状態の円を描画
        }
    }
}このコードでは、RadioButtonを継承したCustomRadioButtonクラスを作成し、OnPaintメソッドをオーバーライドしてカスタム描画を実装しています。
これにより、独自のスタイルを持つRadioButtonを作成できます。
スタイルシートの利用
Windowsフォームアプリケーションでは、スタイルシートを使用して一貫したデザインを適用することも可能です。
以下は、スタイルシートを利用した例です。
private void ApplyStyles()
{
    foreach (Control control in this.Controls)
    {
        if (control is RadioButton radioButton)
        {
            radioButton.Font = new Font("Arial", 10, FontStyle.Italic); // フォントを設定
            radioButton.ForeColor = Color.DarkGreen; // テキストの色を設定
        }
    }
}このコードでは、フォーム内のすべてのRadioButtonに対してフォントと色を一括で設定しています。
これにより、アプリケーション全体のデザインを統一することができます。
このように、RadioButtonのデザインカスタマイズは、アプリケーションのユーザーインターフェースを向上させるための重要な手法です。
まとめ
この記事では、C#のWindowsフォームにおけるRadioButtonのグループ化方法や実践的な活用法、イベント処理、デザインカスタマイズについて詳しく解説しました。
これにより、RadioButtonを効果的に利用するための具体的な手法やテクニックを学ぶことができました。
ぜひ、実際のアプリケーション開発においてこれらの知識を活かし、ユーザーインターフェースをより魅力的で使いやすいものにしてみてください。
![[C#] RadioButtonの初期化方法と注意点](https://af-e.net/wp-content/uploads/2024/09/thumbnail-37283.png)
![[C#] RadioButtonのチェック状態を変更する方法](https://af-e.net/wp-content/uploads/2024/09/thumbnail-37281.png)
![[C#] RadioButtonの使い方と実装方法](https://af-e.net/wp-content/uploads/2024/09/thumbnail-37282.png)
![[C#] radiobuttonでチェックされた項目を取得する方法](https://af-e.net/wp-content/uploads/2024/09/thumbnail-37284.png)
![[C#] RadioButtonのクリックイベントの実装方法](https://af-e.net/wp-content/uploads/2024/09/thumbnail-37276.png)
![[C#] RadioButtonのチェック解除方法](https://af-e.net/wp-content/uploads/2024/09/thumbnail-37278.png)
![[C#] RadioButtonのチェック状態を取得・設定する方法](https://af-e.net/wp-content/uploads/2024/09/thumbnail-37279.png)
![[C#] RadioButtonのチェック状態を取得する方法](https://af-e.net/wp-content/uploads/2024/09/thumbnail-37280.png)