[C#] メッセージボックスの表示位置をカスタマイズする方法
C#でメッセージボックスの表示位置をカスタマイズするには、標準のMessageBoxクラスではなく、Formを使用して独自のダイアログを作成する必要があります。
Formを作成し、StartPositionプロパティをFormStartPosition.Manualに設定し、Locationプロパティで表示位置を指定します。
これにより、メッセージボックスのようなカスタムダイアログを任意の位置に表示できます。
標準のMessageBoxは表示位置を指定できないため、この方法が必要です。
メッセージボックスの表示位置を指定する方法
C#でメッセージボックスを表示する際、標準のMessageBoxクラスでは表示位置を指定することができません。
しかし、カスタムメッセージボックスを作成することで、表示位置を自由に設定することが可能です。
ここでは、画面中央、特定の座標、親ウィンドウに対する相対位置にメッセージボックスを表示する方法について解説します。
画面中央に表示する
画面中央にメッセージボックスを表示するには、画面の解像度を取得し、その中央にウィンドウを配置する必要があります。
以下はそのサンプルコードです。
using System;
using System.Drawing;
using System.Windows.Forms;
class CustomMessageBox : Form
{
    public CustomMessageBox(string message)
    {
        // メッセージボックスのサイズを設定
        this.Size = new Size(300, 150);

        // ラベルを作成してメッセージを表示
        Label label = new Label();
        label.Text = message;
        label.Dock = DockStyle.Fill;
        label.TextAlign = ContentAlignment.MiddleCenter;
        this.Controls.Add(label);

        // 画面中央に配置
        this.StartPosition = FormStartPosition.CenterScreen;
    }

    static void Main()
    {
        Application.Run(new CustomMessageBox("画面中央に表示されるメッセージ"));
    }
}
このコードを実行すると、メッセージボックスが画面の中央に表示されます。
FormStartPosition.CenterScreenを使用することで、簡単に画面中央に配置できます。
特定の座標に表示する
特定の座標にメッセージボックスを表示するには、Locationプロパティを使用してウィンドウの位置を指定します。
以下にその例を示します。
using System;
using System.Drawing;
using System.Windows.Forms;
class CustomMessageBox : Form
{
    public CustomMessageBox(string message, Point location)
    {
        // メッセージボックスのサイズを設定
        this.Size = new Size(300, 150);

        // ラベルを作成してメッセージを表示
        Label label = new Label();
        label.Text = message;
        label.Dock = DockStyle.Fill;
        label.TextAlign = ContentAlignment.MiddleCenter;
        this.Controls.Add(label);

        // 指定された座標に配置
        this.StartPosition = FormStartPosition.Manual;
        this.Location = location;
    }

    static void Main()
    {
        // (100, 100)の座標にメッセージボックスを表示
        Application.Run(new CustomMessageBox("特定の座標に表示されるメッセージ", new Point(100, 100)));
    }
}このコードでは、FormStartPosition.Manualを指定し、Locationプロパティで座標を設定することで、任意の位置にメッセージボックスを表示できます。
親ウィンドウに対する相対位置
親ウィンドウに対する相対位置にメッセージボックスを表示するには、親ウィンドウの位置とサイズを考慮して、メッセージボックスの位置を計算します。
以下にその例を示します。
using System;
using System.Drawing;
using System.Windows.Forms;
class ParentForm : Form
{
    public ParentForm()
    {
        // ボタンを作成してクリックイベントを設定
        Button button = new Button();
        button.Text = "メッセージを表示";
        button.Click += (sender, e) => ShowCustomMessageBox();
        this.Controls.Add(button);
    }

    private void ShowCustomMessageBox()
    {
        // 親ウィンドウの中央にメッセージボックスを表示
        Point location = new Point(this.Location.X + this.Width / 2 - 150, this.Location.Y + this.Height / 2 - 75);
        CustomMessageBox messageBox = new CustomMessageBox("親ウィンドウに対する相対位置に表示されるメッセージ", location);
        messageBox.ShowDialog();
    }

    static void Main()
    {
        Application.Run(new ParentForm());
    }
}
class CustomMessageBox : Form
{
    public CustomMessageBox(string message, Point location)
    {
        // メッセージボックスのサイズを設定
        this.Size = new Size(300, 150);

        // ラベルを作成してメッセージを表示
        Label label = new Label();
        label.Text = message;
        label.Dock = DockStyle.Fill;
        label.TextAlign = ContentAlignment.MiddleCenter;
        this.Controls.Add(label);

        // 指定された座標に配置
        this.StartPosition = FormStartPosition.Manual;
        this.Location = location;
    }
}
このコードでは、親ウィンドウの中央にメッセージボックスを表示するために、親ウィンドウの位置とサイズを基にメッセージボックスの位置を計算しています。
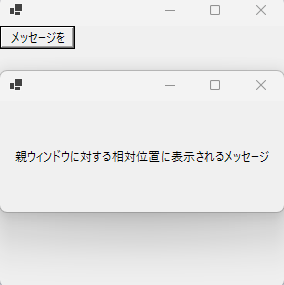
ボタンをクリックすると、親ウィンドウの中央にメッセージボックスが表示されます。
カスタムメッセージボックスのデザイン
カスタムメッセージボックスを作成する際には、ユーザーの操作性を考慮したデザインが重要です。
ここでは、ボタンの追加と配置、テキストとアイコンの設定、そしてユーザーインターフェースの最適化について解説します。
ボタンの追加と配置
メッセージボックスにボタンを追加することで、ユーザーに選択肢を提供できます。
以下のサンプルコードでは、”OK”と”キャンセル”のボタンを追加し、それぞれのクリックイベントを設定しています。
using System;
using System.Drawing;
using System.Windows.Forms;
class CustomMessageBox : Form
{
    public CustomMessageBox(string message)
    {
        // メッセージボックスのサイズを設定
        this.Size = new Size(300, 150);

        // ラベルを作成してメッセージを表示
        Label label = new Label();
        label.Text = message;
        label.Dock = DockStyle.Top;
        label.TextAlign = ContentAlignment.MiddleCenter;
        this.Controls.Add(label);

        // OKボタンを作成
        Button okButton = new Button();
        okButton.Text = "OK";
        okButton.Location = new Point(50, 80);
        okButton.Click += (sender, e) => this.Close();
        this.Controls.Add(okButton);

        // キャンセルボタンを作成
        Button cancelButton = new Button();
        cancelButton.Text = "キャンセル";
        cancelButton.Location = new Point(150, 80);
        cancelButton.Click += (sender, e) => this.Close();
        this.Controls.Add(cancelButton);
    }

    static void Main()
    {
        Application.Run(new CustomMessageBox("ボタンを追加したメッセージ"));
    }
}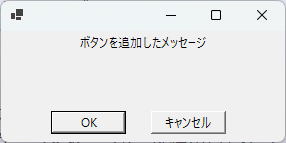
このコードでは、”OK”と”キャンセル”のボタンがメッセージボックスの下部に配置され、クリックするとメッセージボックスが閉じるようになっています。
テキストとアイコンの設定
メッセージボックスにアイコンを追加することで、メッセージの内容を視覚的に強調できます。
以下のサンプルコードでは、情報アイコンを追加しています。
using System;
using System.Drawing;
using System.Windows.Forms;
class CustomMessageBox : Form
{
    public CustomMessageBox(string message)
    {
        // メッセージボックスのサイズを設定
        this.Size = new Size(300, 150);

        // アイコンを作成
        PictureBox iconBox = new PictureBox();
        iconBox.Image = SystemIcons.Information.ToBitmap();
        iconBox.Location = new Point(10, 20);
        iconBox.Size = new Size(32, 32);
        this.Controls.Add(iconBox);

        // ラベルを作成してメッセージを表示
        Label label = new Label();
        label.Text = message;
        label.Location = new Point(50, 20);
        label.Size = new Size(220, 32);
        label.TextAlign = ContentAlignment.MiddleLeft;
        this.Controls.Add(label);

        // OKボタンを作成
        Button okButton = new Button();
        okButton.Text = "OK";
        okButton.Location = new Point(100, 80);
        okButton.Click += (sender, e) => this.Close();
        this.Controls.Add(okButton);
    }

    static void Main()
    {
        Application.Run(new CustomMessageBox("アイコン付きのメッセージ"));
    }
}このコードでは、SystemIcons.Informationを使用して情報アイコンを表示しています。
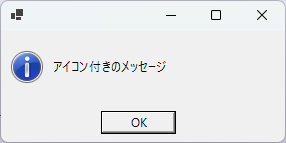
アイコンはメッセージの左側に配置されています。
ユーザーインターフェースの最適化
ユーザーインターフェースを最適化することで、メッセージボックスの使いやすさを向上させることができます。
以下のポイントを考慮してデザインを最適化します。
- レイアウトの調整: ボタンやテキストの配置を整え、視覚的にバランスの取れたデザインにします。
- フォントと色の選択: 読みやすいフォントと色を選び、メッセージの内容を強調します。
- サイズの調整: メッセージの内容に応じてウィンドウサイズを調整し、無駄なスペースを減らします。
これらの要素を考慮することで、ユーザーにとって直感的で使いやすいメッセージボックスを作成することができます。
完成したプログラム
ここでは、これまでに解説した要素を組み合わせて、カスタムメッセージボックスの完成形を示します。
このプログラムは、画面中央に表示され、アイコンとテキストを含み、”OK”と”キャンセル”のボタンを備えたメッセージボックスを表示します。
using System;
using System.Drawing;
using System.Windows.Forms;
class CustomMessageBox : Form
{
    public CustomMessageBox(string message)
    {
        // メッセージボックスのサイズを設定
        this.Size = new Size(350, 200);

        // アイコンを作成
        PictureBox iconBox = new PictureBox();
        iconBox.Image = SystemIcons.Information.ToBitmap();
        iconBox.Location = new Point(20, 30);
        iconBox.Size = new Size(32, 32);
        this.Controls.Add(iconBox);

        // ラベルを作成してメッセージを表示
        Label label = new Label();
        label.Text = message;
        label.Location = new Point(70, 30);
        label.Size = new Size(250, 32);
        label.TextAlign = ContentAlignment.MiddleLeft;
        this.Controls.Add(label);

        // OKボタンを作成
        Button okButton = new Button();
        okButton.Text = "OK";
        okButton.Location = new Point(70, 100);
        okButton.Click += (sender, e) => this.Close();
        this.Controls.Add(okButton);

        // キャンセルボタンを作成
        Button cancelButton = new Button();
        cancelButton.Text = "キャンセル";
        cancelButton.Location = new Point(180, 100);
        cancelButton.Click += (sender, e) => this.Close();
        this.Controls.Add(cancelButton);

        // 画面中央に配置
        this.StartPosition = FormStartPosition.CenterScreen;
    }

    static void Main()
    {
        Application.Run(new CustomMessageBox("これはカスタムメッセージボックスです"));
    }
}
このプログラムを実行すると、以下のようなメッセージボックスが表示されます:
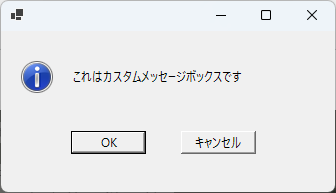
このカスタムメッセージボックスは、ユーザーに対して直感的でわかりやすいインターフェースを提供し、メッセージの内容を効果的に伝えることができます。
応用例
カスタムメッセージボックスの表示位置をさらに柔軟に制御するための応用例を紹介します。
これらの例を参考にすることで、さまざまな環境や要件に対応したメッセージボックスを作成できます。
複数モニター環境での表示位置指定
複数モニター環境では、メッセージボックスを特定のモニターに表示することが求められる場合があります。
以下のコードは、指定したモニターにメッセージボックスを表示する方法を示しています。
using System;
using System.Drawing;
using System.Windows.Forms;
class CustomMessageBox : Form
{
    public CustomMessageBox(string message, Screen targetScreen)
    {
        // メッセージボックスのサイズを設定
        this.Size = new Size(300, 150);

        // ラベルを作成してメッセージを表示
        Label label = new Label();
        label.Text = message;
        label.Dock = DockStyle.Fill;
        label.TextAlign = ContentAlignment.MiddleCenter;
        this.Controls.Add(label);

        // 指定したモニターの中央に配置
        this.StartPosition = FormStartPosition.Manual;
        this.Location = new Point(
            targetScreen.Bounds.X + (targetScreen.Bounds.Width - this.Width) / 2,
            targetScreen.Bounds.Y + (targetScreen.Bounds.Height - this.Height) / 2
        );
    }

    static void Main()
    {
        // 2番目のモニターにメッセージボックスを表示
        Screen targetScreen = Screen.AllScreens.Length > 1 ? Screen.AllScreens[1] : Screen.PrimaryScreen;
        Application.Run(new CustomMessageBox("複数モニター環境での表示", targetScreen));
    }
}このコードでは、Screenクラスを使用してモニター情報を取得し、指定したモニターの中央にメッセージボックスを表示します。
ウィンドウサイズに応じた動的配置
ウィンドウサイズが変更された場合に、メッセージボックスの位置を動的に調整することができます。
以下のコードは、親ウィンドウのサイズ変更に応じてメッセージボックスを再配置する方法を示しています。
using System;
using System.Drawing;
using System.Windows.Forms;
class ParentForm : Form
{
    private CustomMessageBox messageBox;
    public ParentForm()
    {
        // ボタンを作成してクリックイベントを設定
        Button button = new Button();
        button.Text = "メッセージを表示";
        button.Click += (sender, e) => ShowCustomMessageBox();
        this.Controls.Add(button);

        // ウィンドウサイズ変更イベントを設定
        this.SizeChanged += (sender, e) => AdjustMessageBoxPosition();
    }

    private void ShowCustomMessageBox()
    {
        if (messageBox == null || messageBox.IsDisposed)
        {
            messageBox = new CustomMessageBox("動的配置のメッセージ");
            AdjustMessageBoxPosition();
            messageBox.Show(this);
        }
    }

    private void AdjustMessageBoxPosition()
    {
        if (messageBox != null && !messageBox.IsDisposed)
        {
            messageBox.Location = new Point(
                this.Location.X + (this.Width - messageBox.Width) / 2,
                this.Location.Y + (this.Height - messageBox.Height) / 2
            );
        }
    }

    static void Main()
    {
        Application.Run(new ParentForm());
    }
}
class CustomMessageBox : Form
{
    public CustomMessageBox(string message)
    {
        // メッセージボックスのサイズを設定
        this.Size = new Size(300, 150);

        // ラベルを作成してメッセージを表示
        Label label = new Label();
        label.Text = message;
        label.Dock = DockStyle.Fill;
        label.TextAlign = ContentAlignment.MiddleCenter;
        this.Controls.Add(label);
    }
}
このコードでは、親ウィンドウのサイズ変更イベントを利用して、メッセージボックスの位置を動的に調整しています。
ユーザー設定に基づく位置調整
ユーザーの設定に基づいてメッセージボックスの位置を調整することも可能です。
以下のコードは、ユーザーが指定した座標にメッセージボックスを表示する方法を示しています。
using System;
using System.Drawing;
using System.Windows.Forms;
class CustomMessageBox : Form
{
    public CustomMessageBox(string message, Point userDefinedLocation)
    {
        // メッセージボックスのサイズを設定
        this.Size = new Size(300, 150);

        // ラベルを作成してメッセージを表示
        Label label = new Label();
        label.Text = message;
        label.Dock = DockStyle.Fill;
        label.TextAlign = ContentAlignment.MiddleCenter;
        this.Controls.Add(label);

        // ユーザー指定の座標に配置
        this.StartPosition = FormStartPosition.Manual;
        this.Location = userDefinedLocation;
    }

    static void Main()
    {
        // ユーザーが指定した座標にメッセージボックスを表示
        Point userLocation = new Point(200, 200); // 例として(200, 200)を指定
        Application.Run(new CustomMessageBox("ユーザー設定に基づく位置調整", userLocation));
    }
}このコードでは、ユーザーが指定した座標をPointオブジェクトとして受け取り、その位置にメッセージボックスを表示します。
ユーザーの好みに応じて、メッセージボックスの表示位置を柔軟に調整できます。
まとめ
この記事では、C#でカスタムメッセージボックスを作成し、その表示位置を指定する方法について詳しく解説しました。
画面中央や特定の座標、親ウィンドウに対する相対位置にメッセージボックスを配置する技術を学び、さらにボタンの追加やアイコンの設定、ユーザーインターフェースの最適化を通じて、より使いやすいメッセージボックスを設計する方法を紹介しました。
これらの知識を活用して、あなたのアプリケーションに合ったメッセージボックスを実装し、ユーザーエクスペリエンスを向上させてみてください。
![[C#] メッセージボックスにアイコンを追加する方法](https://af-e.net/wp-content/uploads/2024/09/thumbnail-36913.png)
![[C#] メッセージボックスを最前面に表示する方法](https://af-e.net/wp-content/uploads/2024/09/thumbnail-36917.png)
![[C#] メッセージボックスを自作する方法](https://af-e.net/wp-content/uploads/2024/09/thumbnail-36918.png)
![[C#] メッセージボックスの文字サイズを変更する方法](https://af-e.net/wp-content/uploads/2024/09/thumbnail-36921.png)
![[C#] メッセージボックスを自動で閉じる方法](https://af-e.net/wp-content/uploads/2024/09/thumbnail-36919.png)
![[C#] メッセージボックスのボタン名をカスタマイズする方法](https://af-e.net/wp-content/uploads/2024/09/thumbnail-36915.png)
![[C#] メッセージボックスでの改行方法](https://af-e.net/wp-content/uploads/2024/09/thumbnail-36916.png)
![[C#] メッセージボックスのカスタマイズ方法](https://af-e.net/wp-content/uploads/2024/09/thumbnail-36914.png)
![[C#] メッセージボックスでYes/Noオプションを表示する方法](https://af-e.net/wp-content/uploads/2024/09/thumbnail-36912.png)
![[C#] メッセージボックスの使い方と活用法](https://af-e.net/wp-content/uploads/2024/09/thumbnail-36911.png)