[C#] ボタンクリックでアニメーションを行う方法
C#のWindowsフォームでボタンクリック時にアニメーションを行うには、タイマーを使用してUI要素のプロパティを徐々に変更する方法が一般的です。
まず、フォームにボタンとアニメーションさせたいコントロール(例:パネルやラベル)を配置します。
次に、System.Windows.Forms.Timerをフォームに追加し、タイマーのTickイベントでコントロールの位置やサイズ、色などを少しずつ変更します。
ボタンクリックイベントでタイマーを開始し、アニメーションを実行します。
アニメーションが終了したら、タイマーを停止します。
これにより、スムーズなアニメーション効果を実現できます。
ボタンクリックイベントの設定
ボタンクリックイベントの基本
C#のWindowsフォームアプリケーションでは、ボタンクリックイベントを利用してユーザーの操作に応じた処理を実行することができます。
ボタンクリックイベントは、ユーザーがボタンをクリックしたときに発生するイベントで、イベントハンドラーを設定することで、クリック時の動作を定義できます。
ボタンクリックイベントの基本的な流れは以下の通りです。
- ボタンをフォームに配置する。
- ボタンの
Clickイベントにイベントハンドラーを設定する。 - イベントハンドラー内で実行したい処理を記述する。
イベントハンドラーの作成方法
イベントハンドラーは、特定のイベントが発生したときに実行されるメソッドです。
ボタンクリックイベントの場合、以下のようにイベントハンドラーを作成します。
public partial class MyForm : Form
{
    public MyForm()
    {
        InitializeComponent(); // フォームの初期化
        Button myButton = new Button(); // ボタンの作成
        myButton.Text = "クリックしてね"; // ボタンのテキストを設定
        myButton.Click += new EventHandler(MyButton_Click); // クリックイベントにハンドラーを追加
        Controls.Add(myButton); // ボタンをフォームに追加
    }
    private void MyButton_Click(object sender, EventArgs e)
    {
        // ここにクリック時の処理を記述
        MessageBox.Show("ボタンがクリックされました!"); // メッセージボックスを表示
    }
}このコードでは、MyButton_Clickというメソッドがイベントハンドラーとして設定されています。
ボタンがクリックされると、このメソッドが呼び出され、メッセージボックスが表示されます。
イベントハンドラーでのアニメーション開始
ボタンクリックイベントを利用して、アニメーションを開始することも可能です。
例えば、ボタンをクリックしたときに、フォーム上のラベルの位置を徐々に移動させるアニメーションを実装することができます。
以下は、タイマーを使用してラベルを右方向に移動させるアニメーションの例です。
public partial class MyForm : Form
{
    private Label myLabel;
    private Timer animationTimer;
    public MyForm()
    {
        InitializeComponent(); // フォームの初期化
        myLabel = new Label(); // ラベルの作成
        myLabel.Text = "アニメーション"; // ラベルのテキストを設定
        myLabel.Location = new Point(10, 50); // ラベルの初期位置を設定
        Controls.Add(myLabel); // ラベルをフォームに追加
        Button myButton = new Button(); // ボタンの作成
        myButton.Text = "アニメーション開始"; // ボタンのテキストを設定
        myButton.Click += new EventHandler(StartAnimation); // クリックイベントにハンドラーを追加
        Controls.Add(myButton); // ボタンをフォームに追加
        animationTimer = new Timer(); // タイマーの作成
        animationTimer.Interval = 100; // タイマーの間隔を設定(ミリ秒)
        animationTimer.Tick += new EventHandler(AnimateLabel); // タイマーのTickイベントにハンドラーを追加
    }
    private void StartAnimation(object sender, EventArgs e)
    {
        animationTimer.Start(); // タイマーを開始
    }
    private void AnimateLabel(object sender, EventArgs e)
    {
        myLabel.Location = new Point(myLabel.Location.X + 5, myLabel.Location.Y); // ラベルを右に移動
        if (myLabel.Location.X > this.Width) // ラベルがフォームの右端を超えたら
        {
            animationTimer.Stop(); // タイマーを停止
        }
    }
}このコードでは、ボタンをクリックするとStartAnimationメソッドが呼び出され、タイマーが開始されます。
タイマーのTickイベントが発生するたびにAnimateLabelメソッドが呼び出され、ラベルが右に移動します。
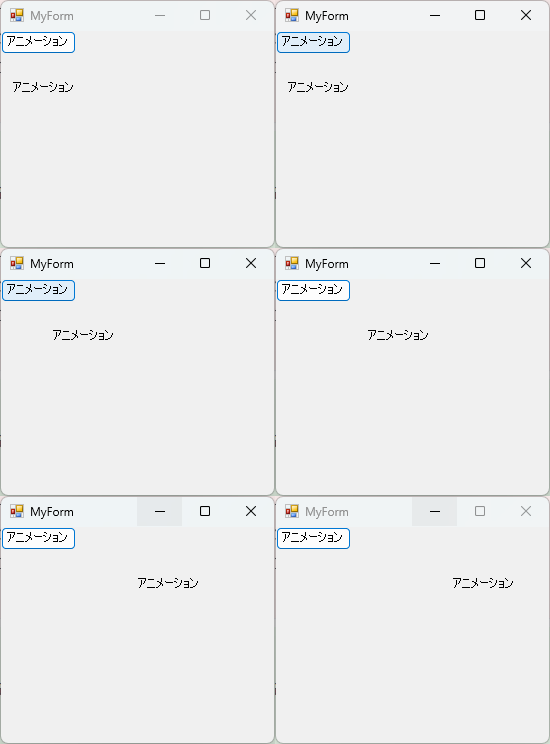
ラベルがフォームの右端を超えると、タイマーが停止します。
タイマーを使ったアニメーション
タイマーの基本的な使い方
C#のWindowsフォームアプリケーションでアニメーションを実装する際、System.Windows.Forms.Timerクラスを使用することが一般的です。
タイマーは一定の間隔でイベントを発生させることができ、これを利用してアニメーションを制御します。
タイマーの基本的な使い方は以下の通りです。
- タイマーオブジェクトを作成する。
- タイマーの
Intervalプロパティでイベント発生の間隔を設定する(ミリ秒単位)。 - タイマーの
Tickイベントにイベントハンドラーを設定する。 - タイマーを開始または停止する。
タイマーを使ったアニメーションの実装
タイマーを使って、フォーム上のオブジェクトをアニメーションさせることができます。
以下は、タイマーを使用してボタンを上下に移動させるアニメーションの例です。
public partial class MyForm : Form
{
    private Button animatedButton;
    private Timer animationTimer;
    private int direction = 1; // 移動方向を示す変数
    public MyForm()
    {
        InitializeComponent(); // フォームの初期化
        animatedButton = new Button(); // ボタンの作成
        animatedButton.Text = "動くボタン"; // ボタンのテキストを設定
        animatedButton.Location = new Point(100, 100); // ボタンの初期位置を設定
        Controls.Add(animatedButton); // ボタンをフォームに追加
        animationTimer = new Timer(); // タイマーの作成
        animationTimer.Interval = 50; // タイマーの間隔を設定(ミリ秒)
        animationTimer.Tick += new EventHandler(AnimateButton); // タイマーのTickイベントにハンドラーを追加
        animationTimer.Start(); // タイマーを開始
    }
    private void AnimateButton(object sender, EventArgs e)
    {
        animatedButton.Location = new Point(animatedButton.Location.X, animatedButton.Location.Y + direction * 5); // ボタンを上下に移動
        if (animatedButton.Location.Y > 200 || animatedButton.Location.Y < 50) // ボタンが一定の範囲を超えたら
        {
            direction *= -1; // 移動方向を反転
        }
    }
}このコードでは、AnimateButtonメソッドがタイマーのTickイベントごとに呼び出され、ボタンが上下に移動します。
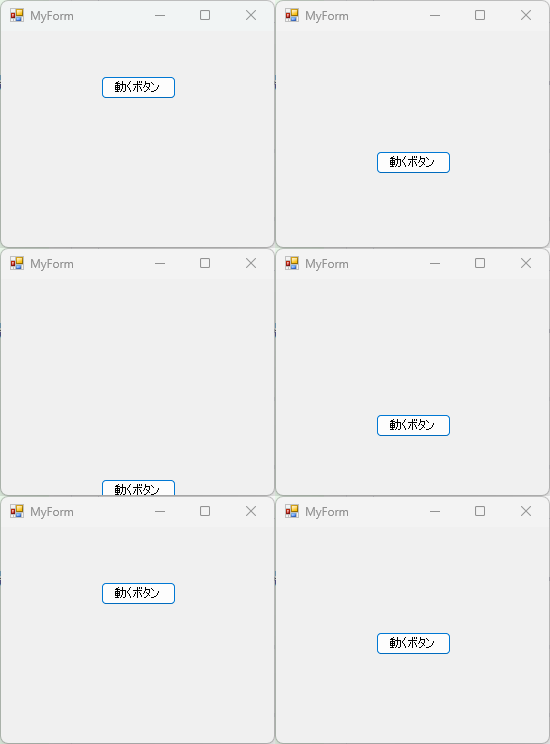
ボタンが指定された範囲を超えると、移動方向が反転します。
タイマーの制御と停止
タイマーの制御は、アニメーションの開始や停止を行うために重要です。
タイマーのStartメソッドを呼び出すとタイマーが開始し、Stopメソッドを呼び出すとタイマーが停止します。
以下は、ボタンをクリックすることでアニメーションを開始または停止する例です。
using System.Drawing;
using System.Windows.Forms;
using System;

public partial class MyForm : Form
{
	private Button controlButton;
	private Timer animationTimer;
	private bool isAnimating = false; // アニメーションの状態を示す変数
	public MyForm()
	{
		InitializeComponent(); // フォームの初期化
		controlButton = new Button(); // ボタンの作成
		controlButton.Text = "アニメーション開始"; // ボタンのテキストを設定
		controlButton.Location = new Point(100, 100); // ボタンの位置を設定
		controlButton.AutoSize = true; // ボタンのサイズを自動調整
		controlButton.Click += new EventHandler(ToggleAnimation); // クリックイベントにハンドラーを追加
		Controls.Add(controlButton); // ボタンをフォームに追加
		animationTimer = new Timer(); // タイマーの作成
		animationTimer.Interval = 50; // タイマーの間隔を設定(ミリ秒)
		animationTimer.Tick += new EventHandler(Animate); // タイマーのTickイベントにハンドラーを追加
	}
	private void ToggleAnimation(object sender, EventArgs e)
	{
		if (isAnimating)
		{
			animationTimer.Stop(); // タイマーを停止
			controlButton.Text = "アニメーション開始"; // ボタンのテキストを更新
		}
		else
		{
			animationTimer.Start(); // タイマーを開始
			controlButton.Text = "アニメーション停止"; // ボタンのテキストを更新
		}
		isAnimating = !isAnimating; // アニメーションの状態を反転
	}
	private void Animate(object sender, EventArgs e)
	{
		// アニメーションの処理を記述
	}
}このコードでは、ToggleAnimationメソッドがボタンのクリックイベントごとに呼び出され、アニメーションの開始と停止を切り替えます。
ボタンのテキストもアニメーションの状態に応じて更新されます。
アニメーションの種類と実装例
Windowsフォームアプリケーションでは、さまざまなアニメーションを実装することができます。
ここでは、移動、サイズ変更、色の変化といった基本的なアニメーションの実装例を紹介します。
移動アニメーション
移動アニメーションは、フォーム上のコントロールを特定の方向に動かすアニメーションです。
以下は、ボタンを右方向に移動させるアニメーションの例です。
public partial class MyForm : Form
{
    private Button moveButton;
    private Timer moveTimer;
    public MyForm()
    {
        InitializeComponent(); // フォームの初期化
        moveButton = new Button(); // ボタンの作成
        moveButton.Text = "動くボタン"; // ボタンのテキストを設定
        moveButton.Location = new Point(10, 100); // ボタンの初期位置を設定
        Controls.Add(moveButton); // ボタンをフォームに追加
        moveTimer = new Timer(); // タイマーの作成
        moveTimer.Interval = 50; // タイマーの間隔を設定(ミリ秒)
        moveTimer.Tick += new EventHandler(MoveButton); // タイマーのTickイベントにハンドラーを追加
        moveTimer.Start(); // タイマーを開始
    }
    private void MoveButton(object sender, EventArgs e)
    {
        moveButton.Location = new Point(moveButton.Location.X + 5, moveButton.Location.Y); // ボタンを右に移動
        if (moveButton.Location.X > this.Width) // ボタンがフォームの右端を超えたら
        {
            moveButton.Location = new Point(0, moveButton.Location.Y); // ボタンを左端に戻す
        }
    }
}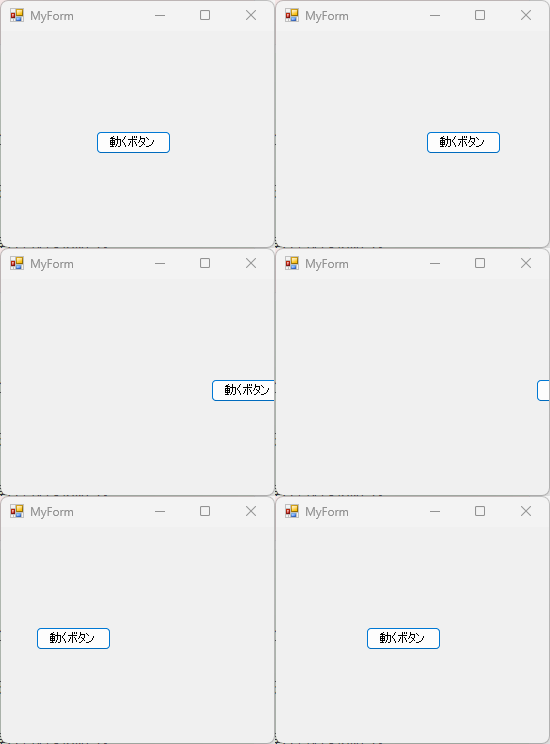
このコードでは、ボタンが右方向に移動し、フォームの右端を超えると左端に戻ります。
サイズ変更アニメーション
サイズ変更アニメーションは、コントロールのサイズを動的に変更するアニメーションです。
以下は、ボタンの幅を増減させるアニメーションの例です。
public partial class MyForm : Form
{
    private Button resizeButton;
    private Timer resizeTimer;
    private int sizeDirection = 1; // サイズ変更の方向を示す変数
    public MyForm()
    {
        InitializeComponent(); // フォームの初期化
        resizeButton = new Button(); // ボタンの作成
        resizeButton.Text = "サイズ変更"; // ボタンのテキストを設定
        resizeButton.Size = new Size(100, 50); // ボタンの初期サイズを設定
        resizeButton.Location = new Point(100, 100); // ボタンの位置を設定
        Controls.Add(resizeButton); // ボタンをフォームに追加
        resizeTimer = new Timer(); // タイマーの作成
        resizeTimer.Interval = 50; // タイマーの間隔を設定(ミリ秒)
        resizeTimer.Tick += new EventHandler(ResizeButton); // タイマーのTickイベントにハンドラーを追加
        resizeTimer.Start(); // タイマーを開始
    }
    private void ResizeButton(object sender, EventArgs e)
    {
        resizeButton.Width += sizeDirection * 5; // ボタンの幅を変更
        if (resizeButton.Width > 150 || resizeButton.Width < 50) // 幅が一定の範囲を超えたら
        {
            sizeDirection *= -1; // サイズ変更の方向を反転
        }
    }
}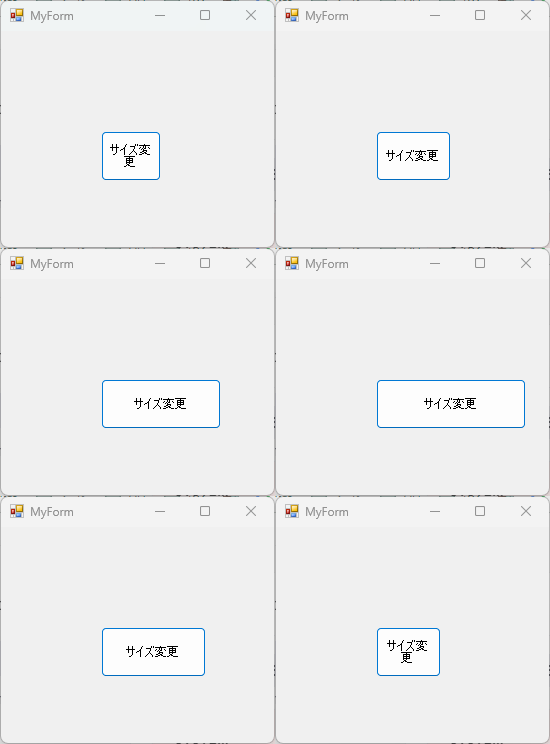
このコードでは、ボタンの幅が増減し、一定の範囲を超えるとサイズ変更の方向が反転します。
色の変化アニメーション
色の変化アニメーションは、コントロールの色を動的に変更するアニメーションです。
以下は、ボタンの背景色を変化させるアニメーションの例です。
public partial class MyForm : Form
{
    private Button colorButton;
    private Timer colorTimer;
    private int colorValue = 0; // 色の値を示す変数
    public MyForm()
    {
        InitializeComponent(); // フォームの初期化
        colorButton = new Button(); // ボタンの作成
        colorButton.Text = "色の変化"; // ボタンのテキストを設定
        colorButton.Size = new Size(100, 50); // ボタンのサイズを設定
        colorButton.Location = new Point(100, 100); // ボタンの位置を設定
        Controls.Add(colorButton); // ボタンをフォームに追加
        colorTimer = new Timer(); // タイマーの作成
        colorTimer.Interval = 50; // タイマーの間隔を設定(ミリ秒)
        colorTimer.Tick += new EventHandler(ChangeColor); // タイマーのTickイベントにハンドラーを追加
        colorTimer.Start(); // タイマーを開始
    }
    private void ChangeColor(object sender, EventArgs e)
    {
        colorValue = (colorValue + 5) % 256; // 色の値を変更
        colorButton.BackColor = Color.FromArgb(colorValue, 100, 150); // ボタンの背景色を設定
    }
}
このコードでは、ボタンの背景色が徐々に変化し、色の値が255を超えると0に戻ります。
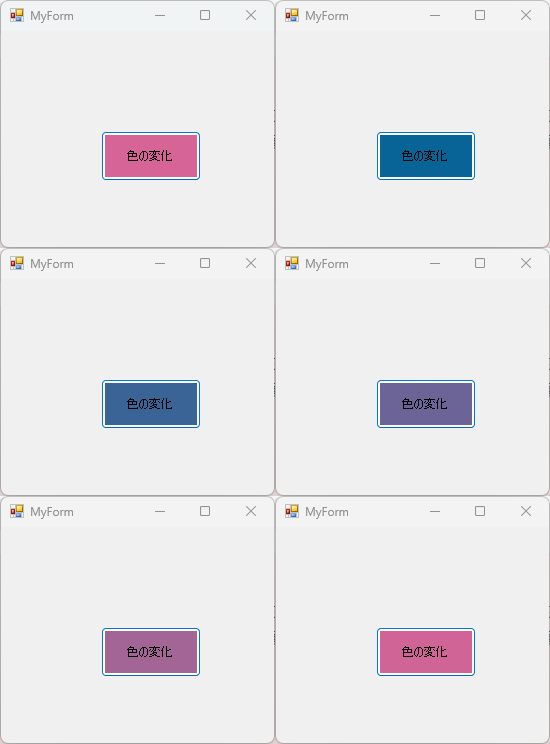
これにより、色が循環的に変化します。
アニメーションの応用例
アニメーションは、ユーザーインターフェースの改善やゲーム開発など、さまざまな場面で応用することができます。
ここでは、複数のアニメーションを組み合わせる方法や、具体的な応用例を紹介します。
複数のアニメーションを組み合わせる
複数のアニメーションを組み合わせることで、より複雑で魅力的な動作を実現できます。
以下は、ボタンの移動と色の変化を同時に行う例です。
public partial class MyForm : Form
{
    private Button animatedButton;
    private Timer animationTimer;
    private int moveDirection = 1; // 移動方向を示す変数
    private int colorValue = 0; // 色の値を示す変数
    public MyForm()
    {
        InitializeComponent(); // フォームの初期化
        animatedButton = new Button(); // ボタンの作成
        animatedButton.Text = "複合アニメーション"; // ボタンのテキストを設定
        animatedButton.Location = new Point(10, 100); // ボタンの初期位置を設定
        Controls.Add(animatedButton); // ボタンをフォームに追加
        animationTimer = new Timer(); // タイマーの作成
        animationTimer.Interval = 50; // タイマーの間隔を設定(ミリ秒)
        animationTimer.Tick += new EventHandler(AnimateButton); // タイマーのTickイベントにハンドラーを追加
        animationTimer.Start(); // タイマーを開始
    }
    private void AnimateButton(object sender, EventArgs e)
    {
        // ボタンを右に移動
        animatedButton.Location = new Point(animatedButton.Location.X + moveDirection * 5, animatedButton.Location.Y);
        if (animatedButton.Location.X > this.Width || animatedButton.Location.X < 0)
        {
            moveDirection *= -1; // 移動方向を反転
        }
        // ボタンの背景色を変化
        colorValue = (colorValue + 5) % 256;
        animatedButton.BackColor = Color.FromArgb(colorValue, 100, 150);
    }
}
このコードでは、ボタンが左右に移動しながら、背景色が変化します。
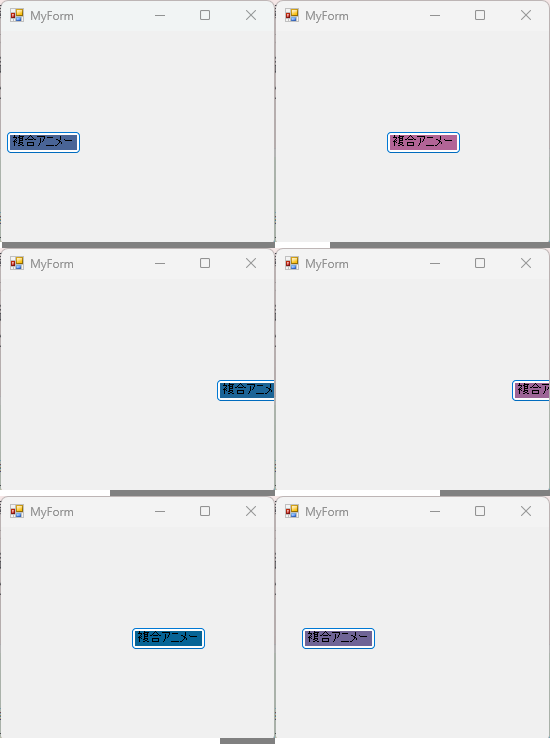
移動と色の変化を同時に行うことで、視覚的に面白い効果を生み出します。
ユーザーインターフェースの改善
アニメーションは、ユーザーインターフェースの改善にも役立ちます。
例えば、ユーザーの操作に応じてアニメーションを追加することで、操作のフィードバックを視覚的に提供できます。
- ボタンのクリック時のアニメーション: ボタンをクリックした際に、ボタンが一瞬縮小して元に戻るアニメーションを追加することで、クリックが認識されたことをユーザーに伝えることができます。
- フォームの遷移アニメーション: フォーム間の遷移時にフェードイン・フェードアウトのアニメーションを追加することで、スムーズな画面遷移を実現できます。
ゲーム開発でのアニメーション利用
ゲーム開発において、アニメーションは非常に重要な要素です。
キャラクターの動きやエフェクトなど、さまざまな場面でアニメーションが活用されます。
- キャラクターの移動アニメーション: キャラクターが移動する際に、歩行や走行のアニメーションを追加することで、リアルな動きを表現できます。
- 攻撃やスキルのエフェクト: 攻撃やスキルの発動時に、エフェクトアニメーションを追加することで、視覚的なインパクトを与えることができます。
- UIのアニメーション: ゲーム内のメニューやインベントリの表示にアニメーションを追加することで、操作性を向上させることができます。
これらの応用例を通じて、アニメーションは単なる視覚効果にとどまらず、ユーザー体験を向上させるための重要な要素であることがわかります。
まとめ
この記事では、C#のWindowsフォームアプリケーションにおけるボタンクリックでのアニメーション実装方法について詳しく解説しました。
ボタンクリックイベントの設定から始まり、タイマーを使ったアニメーションの実装、さらに応用例として複数のアニメーションの組み合わせやユーザーインターフェースの改善、ゲーム開発での利用方法を紹介しました。
これらの知識を活用して、より魅力的でインタラクティブなアプリケーションを作成してみてください。

![[C#] Buttonコントロールの使い方をわかりやすく解説](https://af-e.net/wp-content/uploads/2024/09/thumbnail-41130.png)
![[C#] Buttonで使用できる主なイベントハンドラ一覧](https://af-e.net/wp-content/uploads/2024/09/thumbnail-36982.png)
![[C#] Buttonクリックでエクスプローラーを開く方法](https://af-e.net/wp-content/uploads/2024/09/thumbnail-36983.png)
![[C#] buttonイベントハンドラの設定方法](https://af-e.net/wp-content/uploads/2024/09/thumbnail-36981.png)
![[C#] Buttonコントロールのアンカーを設定して上下左右を整える](https://af-e.net/wp-content/uploads/2024/09/thumbnail-36980.png)
![[C#] ButtonをアクティブにしてEnterキーで押せるようにする方法](https://af-e.net/wp-content/uploads/2024/09/thumbnail-36978.png)
![[C#] ボタンにアクセスキー設定してキー入力できるようにする](https://af-e.net/wp-content/uploads/2024/09/thumbnail-36977.png)
![[C#] ボタンのアイコンを動的に変更する方法](https://af-e.net/wp-content/uploads/2024/09/thumbnail-36976.png)
![[C#] Buttonにアイコンを設定する方法](https://af-e.net/wp-content/uploads/2024/09/thumbnail-36974.png)